Recombinant antibodies offer several key advantages compared to traditional antibodies. These include superior lot-to-lot consistency, continuous supply, and animal-free manufacturing. As such, recombinant antibodies are seeing increased use for scientific research, especially as a means of addressing the ongoing reproducibility crisis.

Traditional polyclonal and monoclonal antibodies are the product of normal B cell development and genetic recombination. They are generated by immunizing an animal with an antigen to elicit an immune response. While polyclonal antibodies are secreted by many different B cell clones and recognize multiple antigenic epitopes, monoclonals originate from a single B cell clone and are specific for just one epitope.
Recombinant antibodies are monoclonal, but their production involves in vitro genetic manipulation. After cloning the antibody genes into an expression vector, this is then transfected into an appropriate host cell line for antibody expression. Mammalian cell lines are most commonly used for recombinant antibody production, although cell lines of bacterial, yeast, or insect origin are also suitable.
Because recombinant antibody production involves sequencing the antibody light and heavy chains, it is a highly controlled and reliable process. In contrast, hybridoma-based systems for producing monoclonal antibodies are subject to genetic drift and instability, increasing the potential for lot-to-lot variability or loss of antibody expression. Recombinant antibodies are highly consistent from lot to lot, thereby ensuring reproducible experimental results.
In vitro methods for producing antibodies are amenable to large-scale production, meaning antibody availability is unlikely to become a limiting factor. Moreover, since the recombinant antibody sequence is known, continuity of supply is assured; in situations where an antibody will be used to support large, long-term studies, this can be an especially critical factor.
Unlike traditional methods for antibody production, recombinant approaches avoid the need to use animals. Where polyclonal antibodies are purified directly from the serum of the immunized host, and monoclonals are purified from either hybridoma-derived tissue culture supernatant or ascites, recombinant antibodies are instead purified from the tissue culture supernatants of transfected host cell lines. Regardless of whether an antibody is polyclonal, monoclonal or recombinant, it must always be properly validated in the intended application prior to experimental use. At CST, we adhere to the Hallmarks of Antibody Validation™, six complementary strategies for determining the specificity, sensitivity, and functionality of an antibody in any given assay. By carefully tailoring these strategies to each antibody product, we guarantee that CST antibodies will work as expected, to help you achieve results you can trust.

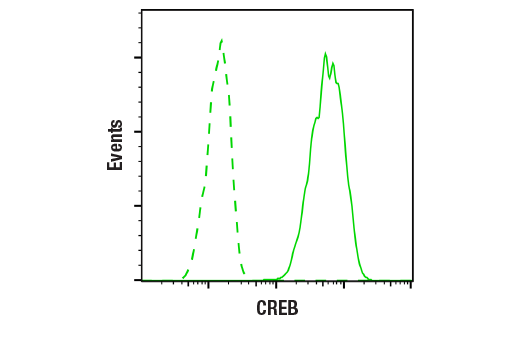
Flow cytometric analysis of SH-SY5Y cells, using CREB (D76D11) Rabbit mAb Antibody (solid line) or concentration matched Rabbit (DA1E) mAb IgG XP® Isotype Control #3900 (dashed line).
| Cat. # | Size | Qty. | Price |
|---|---|---|---|
| 4820S | 100 µl |
|
| REACTIVITY | H M R Hm Mk Dm |
| SENSITIVITY | Endogenous |
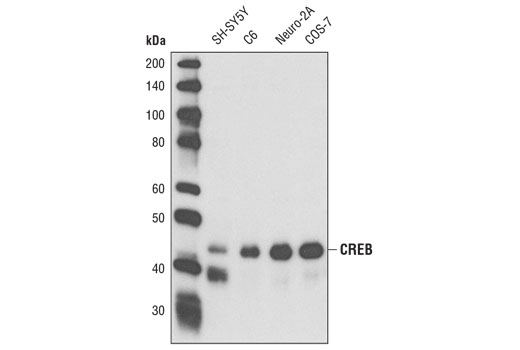
| MW (kDa) | 43 |
| Source/Isotype | Rabbit IgG |
Product Information
For optimal ChIP results, use 5 μl of antibody and 10 μg of chromatin (approximately 4 x 10⁶ cells) per IP. This antibody has been validated using SimpleChIP® Enzymatic Chromatin IP Kits.
| Application | Dilution |
|---|---|
| Western Blotting | 1:1000 |
| Immunoprecipitation | 1:50 |
| Immunofluorescence (Frozen) | 1:400 - 1:1600 |
| Immunofluorescence (Immunocytochemistry) | 1:400 - 1:1600 |
| Flow Cytometry (Fixed/Permeabilized) | 1:200 - 1:800 |
| Chromatin IP | 1:100 |
| CUT&Tag | 1:50 |
For western blots, incubate membrane with diluted primary antibody in 5% w/v BSA, 1X TBS, 0.1% Tween® 20 at 4°C with gentle shaking, overnight.
NOTE: Please refer to primary antibody product webpage for recommended antibody dilution.
From sample preparation to detection, the reagents you need for your Western Blot are now in one convenient kit: #12957 Western Blotting Application Solutions Kit
NOTE: Prepare solutions with reverse osmosis deionized (RODI) or equivalent grade water.
Load 20 µl onto SDS-PAGE gel (10 cm x 10 cm).
NOTE: Loading of prestained molecular weight markers (#59329, 10 µl/lane) to verify electrotransfer and biotinylated protein ladder (#7727, 10 µl/lane) to determine molecular weights are recommended.
NOTE: Volumes are for 10 cm x 10 cm (100 cm2) of membrane; for different sized membranes, adjust volumes accordingly.
* Avoid repeated exposure to skin.
posted June 2005
revised June 2020
Protocol Id: 10
This protocol is intended for immunoprecipitation of native proteins utilizing Protein A agarose beads for analysis by western immunoblot or kinase activity.
NOTE: Prepare solutions with reverse osmosis deionized (RODI) or equivalent grade water.
10X Cell Lysis Buffer: (#9803) To prepare 10 ml of 1X cell lysis buffer, add 1 ml cell lysis buffer to 9 ml dH2O, mix.
NOTE: Add 1 mM PMSF (#8553) immediately prior to use.
IMPORTANT: Appropriate isotype controls are highly recommended in order to show specific binding in your primary antibody immunoprecipitation. Use Normal Rabbit IgG #2729 for rabbit polyclonal primary antibodies, Rabbit (DA1E) mAb IgG XP® Isotype Control #3900 for rabbit monoclonal primary antibodies, Mouse (G3A1) mAb IgG1 Isotype Control #5415 for mouse monoclonal IgG1 primary antibodies, Mouse (E5Y6Q) mAb IgG2a Isotype Control #61656 for mouse monoclonal IgG2a primary antibodies, Mouse (E7Q5L) mAb IgG2b Isotype Control #53484 for mouse monoclonal IgG2b primary antibodies, and Mouse (E1D5H) mAb IgG3 Isotype Control #37988 for mouse monoclonal IgG3 primary antibodies. Isotype controls should be concentration matched and run alongside the primary antibody samples.
Proceed to one of the following specific set of steps.
NOTE: When using primary antibodies produced in rabbit to detect proteins with a molecular weight in the range of 50 kDa, we recommend using Mouse Anti-Rabbit IgG (Light-Chain Specific) (D4W3E) mAb (#45262) or Mouse Anti-Rabbit IgG (Conformation Specific) (L27A9) mAb (#3678) (or HRP conjugate #5127) as a secondary antibody to minimize interference produced by denatured rabbit heavy chain. For proteins with a molecular weight in the range of 25 kDa, Mouse Anti-Rabbit IgG (Conformation Specific) (L27A9) mAb (#3678) (or HRP conjugate #5127) is recommended to minimize interference produced by denatured mouse light chain.
When using primary antibodies produced in mouse to detect proteins with a molecular weight in the range of 50 kDa, we recommend using Rabbit Anti-Mouse IgG (Light Chain Specific) (D3V2A) mAb (HRP Conjugate) (#58802) as a secondary antibody to minimize interference produced by denatured mouse heavy chain.
posted December 2008
revised October 2021
Protocol Id: 409
NOTE: Prepare solutions with reverse osmosis deionized (RODI) or equivalent grade water.
Recommended Fluorochrome-conjugated Anti-Rabbit secondary antibodies:
NOTE: When using any primary or fluorochrome-conjugated secondary antibody for the first time, titrate the antibody to determine which dilution allows for the strongest specific signal with the least background for your sample.
Cover sections with 4% formaldehyde dilute in 1X PBS.
NOTE: Formaldehyde is toxic, use only in fume hood.
NOTE: All subsequent incubations should be carried out at room temperature unless otherwise noted in a humid light-tight box or covered dish/plate to prevent drying and fluorochrome fading.
posted November 2006
revised July 2016
Protocol Id: 151
Achieve higher quality immunofluorescent images using the efficient and cost-effective, pre-made reagents in our #12727 Immunofluorescence Application Solutions Kit
NOTE: Prepare solutions with reverse osmosis deionized (RODI) or equivalent grade water.
Recommended Fluorochrome-conjugated Anti-Rabbit secondary antibodies:
NOTE: Cells should be grown, treated, fixed and stained directly in multi-well plates, chamber slides or on coverslips.
Aspirate liquid, then cover cells to a depth of 2–3 mm with 4% formaldehyde diluted in 1X PBS.
NOTE: Formaldehyde is toxic, use only in a fume hood.
NOTE: All subsequent incubations should be carried out at room temperature unless otherwise noted in a humid light-tight box or covered dish/plate to prevent drying and fluorochrome fading.
posted November 2006
revised November 2013
Protocol Id: 24
All reagents required for this protocol may be efficiently purchased together in our Intracellular Flow Cytometry Kit (Methanol) #13593, or individually using the catalog numbers listed below.
NOTE: Prepare solutions with reverse osmosis deionized (RODI) or equivalent grade water.
NOTE: When including fluorescent cellular dyes in your experiment (including viability dyes, DNA dyes, etc.), please refer to the dye product page for the recommended protocol. Visit www.cellsignal.com for a full listing of cellular dyes validated for use in flow cytometry.
NOTE: Adherent cells or tissue should be dissociated and in single-cell suspension prior to fixation.
NOTE: Optimal centrifugation conditions will vary depending upon cell type and reagent volume. Generally, 150-300g for 1-5 minutes will be sufficient to pellet the cells.
NOTE: If using whole blood, lyse red blood cells and wash by centrifugation prior to fixation.
NOTE: Antibodies targeting CD markers or other extracellular proteins may be added prior to fixation if the epitope is disrupted by formaldehyde and/or methanol. The antibodies will remain bound to the target of interest during the fixation and permeabilization process. However, note that some fluorophores (including PE and APC) are damaged by methanol and thus should not be added prior to permeabilization. Conduct a small-scale experiment if you are unsure.
NOTE: Count cells using a hemocytometer or alternative method.
posted July 2009
revised June 2020
Protocol Id: 404
Specific for product: SimpleChIP® Plus Enzymatic Chromatin IP Kit (Magnetic Beads) #9005.
Reagents Included:
Reagents Not Included:
| ! | This ! signifies an important step in the protocol regarding volume changes based on the number of immunoprecipitation preparations (IP preps). One IP prep is defined as 4 x 10⁶ tissue cultured cells or 25 mg or disaggregated tissue. |
| !! | This !! signifies an important step to dilute a buffer before proceeding. |
| SAFE STOP | This is a safe stopping point in the protocol, if stopping is necessary. |
When harvesting tissue, remove unwanted material such as fat and necrotic material from the sample. Tissue can then be processed and cross-linked immediately, or frozen on dry ice and stored at -80°C for processing later. For optimal chromatin yield and ChIP results, use 25 mg of tissue for each immunoprecipitation to be performed. The chromatin yield does vary between tissue types and some tissues may require more than 25 mg for each immunoprecipitation. Please see Appendix A for more information regarding the expected chromatin yield for different types of tissue. One additional chromatin sample should be processed for Analysis of Chromatin Digestion and Concentration (Section IV). If desired, five additional chromatin samples should be processed for Optimization of Chromatin Digestion (Appendix B).
(!) All buffer volumes should be increased proportionally based on the number of IP preps in the experiment.
For optimal ChIP results, use approximately 4 X 10⁶ cells for each immunoprecipitation to be performed (at least 12 X 106 cells are required in order to include positive and negative controls). For HeLa cells, one IP is equivalent to half of a 15 cm culture dish containing cells that are 90% confluent in 20 ml of growth medium. One additional sample should be processed for Analysis of Chromatin Digestion and Concentration (Section IV). Since every cell type is different, we recommend including one extra dish of cells in experiment to be used for determination of cell number using a hemocytometer or cell counter.
(!) All buffer volumes should be increased proportionally based on the number of 15 cm tissue culture dishes (or 20 ml suspension cells) used.
(!) All buffer volumes should be increased proportionally based on the number of IP preps in the experiment.
(!!) IMPORTANT: Once in solution, store 1M DTT at -20°C.
NOTE: For optimal ChIP results, it is highly critical that the chromatin is of appropriate size and concentration. Over-digestion of chromatin may diminish signal in the PCR quantification. Under-digestion of chromatin may lead to increased background signal and lower resolution. Adding too little chromatin to the IP may result in diminished signal in the PCR quantification. A protocol for optimization of chromatin digestion can be found in Appendix B.
For optimal ChIP results, use approximately 5 to 10 µg of digested, cross-linked chromatin (as determined in Section IV) per immunoprecipitation. This should be roughly equivalent to a single 100 µl IP prep from 25 mg of disaggregated tissue or 4 x 10⁶ tissue culture cells. Typically, 100 µl of digested chromatin is diluted into 400 µl 1X ChIP Buffer prior to the addition of antibodies. However, if more than 100 µl of chromatin is required per IP, the cross-linked chromatin preparation does not need to be diluted as described below. Antibodies can be added directly to the undiluted chromatin preparation for immunoprecipitation of chromatin complexes.
(!) All buffer volumes should be increased proportionally based on the number of immunoprecipitations in the experiment.
NOTE: Most antibodies from Cell Signaling Technology work optimally between 1 and 2 ug per IP sample. In the case where there are multiple samples with varying concentrations, it is best to match the negative control Normal Rabbit IgG #2729 to the highest antibody concentration.
(!) All buffer volumes should be increased proportionally based on the number of immunoprecipitations in the experiment.
| Primer length: | 24 nucleotides |
| Optimum Tm: | 60°C |
| Optimum GC: | 50% |
| Amplicon size: | 150 to 200 bp (for standard PCR) |
| 80 to 160 bp (for real-time quantitative PCR) |
| Reagent | Volume for 1 PCR Reaction (18 µl) |
|---|---|
| Nuclease-free H2O | 12.5 µl |
| 10X PCR Buffer | 2.0 µl |
| 4 mM dNTP Mix | 1.0 µl |
| 5 µM RPL30 Primers | 2.0 µl |
| Taq DNA Polymerase | 0.5 µl |
| a. | Initial Denaturation | 95°C | 5 min |
| b. | Denature | 95°C | 30 sec |
| c. | Anneal | 62°C | 30 sec |
| d. | Extension | 72°C | 30 sec |
| e. | Repeat Steps b-d for a total of 34 cycles. | ||
| f. | Final Extension | 72°C | 5 min |
| Reagent | Volume for 1 PCR Reaction (18 µl) |
|---|---|
| Nuclease-free H2O | 6 µl |
| 5 µM RPL30 Primers | 2 µl |
| SimpleChIP® Universal qPCR Master Mix #88989 | 10 µl |
| a. | Initial Denaturation | 95°C 3 min |
| b. | Denature | 95°C 15 sec |
| c. | Anneal and Extension: | 60°C 60 sec |
| d. | Repeat steps b and c for a total of 40 cycles. | |
Analyze quantitative PCR results using the software provided with the real-time PCR machine. Alternatively, one can calculate the IP efficiency manually using the Percent Input Method and the equation shown below. With this method, signals obtained from each immunoprecipitation are expressed as a percent of the total input chromatin.
Percent Input = 2% x 2(C[T] 2%Input Sample - C[T] IP Sample)
C[T] = CT = Threshold cycle of PCR reaction
The immuno-enriched DNA samples prepared with this kit are directly compatible with ChIP-seq. For downstream NG-sequencing DNA library construction, use a DNA library preparation protocol or kit compatible with your downstream sequencing platform. For sequencing on Illumina® platforms, we recommend DNA Library Prep Kit for Illumina® (ChIP-seq, CUT&RUN) #56795 and its associated index primers Multiplex Oligos for Illumina® (Single Index Primers) (ChIP-seq, CUT&RUN) #29580 or Multiplex Oligos for Illumina® (Dual Index Primers) (ChIP-seq, CUT&RUN) #47538.
Recommendations:
When harvesting cross-linked chromatin from tissue samples, the yield of chromatin can vary significantly between tissue types. The table to the right provides a range for the expected yield of chromatin from 25 mg of tissue compared to 4 x 10⁶ HeLa cells, and the expected DNA concentration, as determined in Section IV of the protocol. For each tissue type, disaggregation using a Medimachine (BD Biosciences) or a Dounce homogenizer yielded similar amounts of chromatin. However, chromatin processed from tissues disaggregated using the Medimachine typically gave higher IP efficiencies than chromatin processed from tissues disaggregated using a Dounce homogenizer. A Dounce homogenizer is strongly recommended for disaggregation of brain tissue, as the Medimachine does not adequately disaggregate brain tissue into a single-cell suspension. For optimal ChIP results, we recommend using 5 to 10 µg of digested, cross-linked chromatin per immunoprecipitation; therefore, some tissues may require harvesting more than 25 mg per each immunoprecipitation.
| Tissue/Cell | Total Chromatin Yield | Expected DNA Concentration |
|---|---|---|
| Spleen | 20-30 µg per 25 mg tissue | 200-300 µg/ml |
| Liver | 10-15 µg per 25 mg tissue | 100-150 µg/ml |
| Kidney | 8-10 µg per 25 mg tissue | 80-100 µg/ml |
| Brain | 2-5 µg per 25 mg tissue | 20-50 µg/ml |
| Heart | 2-5 µg per 25 mg tissue | 20-50 µg/ml |
| HeLa | 10-15 µg per 4 x 10⁶ cells | 100-150 µg/ml |
Optimal conditions for the digestion of cross-linked chromatin DNA to 150-900 base pairs in length is highly dependent on the ratio of Micrococcal Nuclease to the amount of tissue or number of cells used in the digest. Below is a protocol for determination of the optimal digestion conditions for a specific tissue or cell type.
| Problem | Possible Causes | Recommendation |
|---|---|---|
| 1. Concentration of the digested chromatin is too low. | Not enough cells added to the chromatin digestion or nuclei were not completely lysed after digestion. | If DNA concentration of the chromatin preparation is close to 50 µg/ml, add additional chromatin to each IP to give at least 5 µg/IP and continue with protocol. Count a separate plate of cells before cross-linking to determine an accurate cell number and/or visualize nuclei under microscope before and after sonication to confirm complete lysis of nuclei. |
| 2. Chromatin is under-digested and fragments are too large (greater than 900 bp). | Cells may have been over cross-linked. Cross-linking for longer than 10 min may inhibit digestion of chromatin. Too many cells or not enough Micrococcal Nuclease was added to the chromatin digestion. | Perform a time course at a fixed formaldehyde concentration. Shorten the time of cross-linking to 10 min or less. Count a separate plate of cells before cross-linking to determine accurate cell number and see Appendix B for optimization of chromatin digestion. |
| 3. Chromatin is over-digested and fragments are too small (exclusively 150 bp mono-nucleosome length). Complete digestion of chromatin to mono-nucleosome length DNA may diminish signal during PCR quantification, especially for amplicons greater than 150 bp in length. | Not enough cells or too much Micrococcal Nuclease added to the chromatin digestion. | Count a separate plate of cells before cross-linking to determine accurate cell number and see Appendix B for optimization of chromatin digestion. |
| 4. No product or very little product in the input PCR reactions. | Not enough DNA added to the PCR reaction or conditions are not optimal. PCR amplified region may span nucleosome-free region. Not enough chromatin added to the IP or chromatin is over-digested. | Add more DNA to the PCR reaction or increase the number of amplification cycles. Optimize the PCR conditions for experimental primer set using purified DNA from cross-linked and digested chromatin. Design a different primer set and decrease length of amplicon to less than 150 bp (see primer design recommendations in Section VIII). For optimal ChIP results add 5-10 µg chromatin per IP. See recommendations for problems 1 and 3 above. |
| 5. No product in the positive control Histone H3-IP RPL30 PCR reaction. | Not enough chromatin or antibody added to the IP reaction or IP incubation time is too short. Incomplete elution of chromatin from Protein G beads. | Be sure to add 5-10 µg of chromatin and 10 µl of antibody to each IP reaction and incubate with antibody over-night and an additional 2 h after adding Protein G beads. Elution of chromatin from Protein G beads is optimal at 65°C with frequent mixing to keep beads suspended in solution. |
| 6. Quantity of product in the negative control Rabbit IgG-IP and positive control Histone H3-IP PCR reactions is equivalent. | Too much or not enough chromatin added to the IP reaction. Alternatively, too much antibody added to the IP reaction. Too much DNA added to the PCR reaction or too many cycles of amplification. | Add no more than 15 µg of chromatin and 10 µl of histone H3 antibody to each IP reaction. Reduce the amount of normal rabbit IgG to 1 µl per IP. Add less DNA to the PCR reaction or decrease the number of PCR cycles. It is very important that the PCR products are analyzed within the linear amplification phase of PCR. Otherwise, the differences in quantities of starting DNA can not be accurately measured. |
| 7. No product in the Experimental Antibody-IP PCR reaction. | Not enough DNA added to the PCR reaction. Not enough antibody added to the IP reaction. Antibody does not work for IP. | Add more DNA to the PCR reaction or increase the number of amplification cycles. Typically a range of 1 to 5 µg of antibody are added to the IP reaction; however, the exact amount depends greatly on the individual antibody. Increase the amount of antibody added to the IP. Find an alternate antibody source. |
posted December 2011
revised April 2022
Protocol Id: 82
| ! | This ! signifies an important step in the protocol regarding volume changes based on the number of CUT&Tag reactions being performed. |
| !! | This !! signifies an important step to dilute a buffer before proceeding. |
| SAFE STOP | This is a safe stopping point in the protocol, if stopping is necessary. |
! All buffer volumes should be scaled proportionally to the number of CUT&Tag reactions being performed.
Place Concanavalin A Bead Activation Buffer on ice.
Determine the number of CUT&Tag reactions to be run. We strongly suggest including a reaction for the positive control Tri-Methyl-Histone H3 (Lys4) (C42D8) Rabbit mAb #9751. The negative control Normal Rabbit IgG #2729 or Normal Mouse IgG #68860 is optional, depending on the requirements of the peak calling algorithm to be used.
Carefully resuspend Concanavalin A Magnetic Beads into a homogeneous slurry by gently pipetting up and down, making sure not to splash any bead suspension out of the tube.
NOTE: Avoid vortexing of the Concanavalin A Magnetic Bead suspension throughout the protocol as repeated vortexing may displace the Concanavalin A from the beads.
Transfer 10 µl of the bead suspension for each CUT&Tag reaction to a new 1.5 ml microcentrifuge tube. If planning to do more than 14 CUT&Tag reactions at one time, use two or more 1.5 ml microcentrifuge tubes. No more than 140µl of Concanavalin A beads should be added to each 1.5 ml microcentrifuge tube.
Add 100 µl of Concanavalin A Bead Activation Buffer per 10 µl of beads. Gently mix beads by pipetting up and down.
Place tube on a magnetic rack for 30 sec to 2 min and then remove the supernatant using a pipette.
NOTE: To avoid loss of beads, do NOT aspirate using a vacuum throughout the protocol.
Remove tubes from the magnetic rack. Wash the beads a second time by repeating steps 4 and 5.
Add a volume of Concanavalin A Bead Activation Buffer equal to the initial volume of bead suspension added (10 µl per reaction) and resuspend by pipetting up and down.
NOTE: The activated beads can be stored on ice for up to 8 hrs.
For most cell types, live cells can be used in the CUT&Tag assay to generate robust enrichment of histones, transcription factors, and cofactors. We strongly recommend using live cells whenever possible. For certain cell types that are fragile or sensitive to Concanavalin A, please refer to Appendix A for a light fixation protocol of cells prior to CUT&Tag. Please note that cell fixation does not increase CUT&Tag signals and over-fixation can be detrimental to the tagmentation reaction.
Fresh tissues can also be used in the CUT&Tag assay to generate robust enrichment of histones. However, non-histone targets such as transcription factors and cofactors are not well enriched in the CUT&Tag assay. For analysis of transcription factors and cofactors in tissues, we recommend using the CUT&RUN Assay Kit #86652. Fresh tissues typically generate comparable or stronger CUT&Tag signals than fixed tissues. If fixation is necessary, refer to Appendix B for a light fixation protocol of tissues prior to the CUT&Tag experiment.
Our CUT&Tag assay works with a variety of different cell and tissue types and a wide range of starting material amounts. We recommend using 100,000 cells or 1 mg of tissue per reaction. If starting cell number is limited, histone modification targets may work with as few as 5,000 to 10,000 cells per reaction, and transcription factors and cofactors may work with as few as 20,000 cells per reaction. Success of low input reactions depends on target abundance and antibody sensitivity. An adequate amount of starting material is critical for desired CUT&Tag signal, especially for transcription factors and cofactors. Up to 250,000 cells or 5 mg tissue can be used per reaction. Buffer volumes throughout the protocol used in one reaction do not need to be adjusted based on the cell number or tissue mass, as long as the values fall within the designated range (5,000-250,000 cells or 1-5 mg of tissue). When indicated, buffer volumes do need to be scaled proportionally to the number of reactions being performed.
The amount of digitonin recommended for cell permeabilization is in excess and should be sufficient for permeabilization of most cell lines and tissue types. However, not all cell lines and tissues exhibit the same sensitivity to digitonin. If your specific cell line or tissue does not work with the recommended digitonin concentration, you can optimize conditions by following the protocol provided in Appendix C. Digitonin treatment should result in permeabilization of > 90% of the cell population.
! All buffer volumes should be scaled proportionally to the number of CUT&Tag reactions being performed.
Thoroughly thaw 200X Protease Inhibitor Cocktail #7012 and 100X Spermidine #27287 before use and store them at -20°C when finished for the day. Please note that the Protease Inhibitor Cocktail #7012 will refreeze when placed on ice due to containing DMSO.
Prepare Complete Wash Buffer (2 ml for each cell preparation and an additional 100 µl for each CUT&Tag reaction) and keep at room temperature. For example, if using both untreated and drug-treated cells (2 cell preparations) and testing with 4 antibodies (positive control H3K4me3 #9751, negative control IgG #2729 or #68860, and two experimental antibodies; 8 reactions), a total of 4.8 ml of Complete Wash Buffer will be needed.
|
Complete Wash Buffer |
Volume (per cell preparation) |
Volume (per reaction) |
Total volume |
|
10X Wash buffer (CUT&RUN, CUT&Tag) #31415 |
200 µl |
10 µl |
Add both columns together for total volume needed for each reagent. |
|
100X Spermidine #27287 |
20 µl |
1 µl |
|
|
Protease Inhibitor Cocktail (200X) #7012 |
10 µl |
0.5 µl |
|
|
Nuclease free water #12931 |
1770 µl |
88.5 µl |
NOTE: All steps for live cell preparation should be performed in succession at room temperature to minimize stress on the cells. Do not vortex cell samples to avoid DNA fragmentation and cavitation of cells.
Harvest 100,000 live cells for each reaction at room temperature to minimize stress on the cells.
NOTE: For adherent cells, detach them from the dish using Trypsin and neutralize with at least 3 volumes of tissue culture medium. We do not recommend scraping the cells from the dish to prevent cell lysis. Cells should be counted accurately using a hemocytometer or a cell counter to ensure that an accurate number of cells are being used for the experiment.
Centrifuge cell suspension for 3 min at 600 x g at room temperature and remove the supernatant.
NOTE: If working with fewer than 100,000 total cells and the centrifuged cell pellet is not visible by eye, we recommend skipping the wash steps 3 to 5 below and moving directly to Step 6. After the initial centrifugation of the cell suspension in Step 2, remove most of the supernatant, leaving behind ≤40 µl of supernatant per reaction. Then in Step 6, add enough Complete Wash Buffer to the cell suspension to achieve a total volume of 100 µl per reaction.
Resuspend cell pellet in 1 ml of Complete Wash Buffer at room temperature by gently pipetting up and down.
Centrifuge for 3 min at 600 x g at room temperature and remove the supernatant.
Wash the cell pellet a second time by repeating steps 3 and 4 one time.
Add 100 µl of Complete Wash Buffer per reaction and resuspend the cell pellet by gently pipetting up and down.
Immediately proceed to Section III.
! All buffer volumes should be increased proportionally based on the number of CUT&Tag reactions being performed.
Thoroughly thaw 200X Protease Inhibitor Cocktail #7012 and 100X Spermidine #27287 before use and store them at -20°C when finished for the day. Please note that the Protease Inhibitor Cocktail #7012 will refreeze when placed on ice due to containing DMSO.
Prepare Complete Wash Buffer (3 ml for each tissue type and additional 100 µl for each reaction) and keep it at room temperature to minimize stress on the cells. For example, if using wild type and transgenic liver as starting material (2 tissue types) and testing 4 antibodies (positive control H3K4me3 #9751, negative control IgG #2729 or #68860, and two experimental antibodies; 8 reactions), a total of 6.8 mL of Complete Wash Buffer is needed.
|
Complete Wash Buffer |
Volume (per tissue type) |
Volume (per reaction) |
Total volume |
|
10X Wash buffer (CUT&RUN, CUT&Tag) #31415 |
300 µl |
10 µl |
Add both columns together for total volume needed for each reagent. |
|
100X Spermidine #27287 |
30 µl |
1 µl |
|
|
Protease Inhibitor Cocktail (200X) #7012 |
15 µl |
0.5 µl |
|
|
Nuclease free water #12931 |
2655 µl |
88.5 µl |
Weigh 1 mg fresh tissue for each reaction.
Place tissue sample in a dish and finely mince using a clean scalpel or razor blade. Keep dish on ice. It is important to keep the tissue cold to avoid protein degradation.
Resuspend tissue in 1 ml of Complete Wash Buffer and transfer the sample to a Dounce homogenizer.
Disaggregate tissue pieces into a single-cell suspension with 20-25 strokes until no tissue chunks are observed.
Transfer cell suspension to a 1.5 ml tube and centrifuge at 3,000 x g for 3 min at room temperature, and pipette to remove supernatant from cells.
Resuspend the cell pellet in 1 ml of Complete Wash Buffer.
Centrifuge cell suspension for 3 min at 3,000 x g at room temperature and remove the supernatant.
Wash the cell pellet a second time by repeating steps 6 and 7 one time.
Add 100 µl of Complete Wash Buffer per reaction and resuspend the cell pellet by gently pipetting up and down.
Immediately proceed to Section III.
NOTE: For all incubation steps in Sections III-V, it is not necessary to mix samples by rocking or rotation. Instead, we recommend simply placing sample tubes in a rack at the designated temperatures. Mixing the samples during the incubation steps does not increase the performance of the assay. Instead, rotation or rocking the samples may lead to increased bead clumping and bead loss due to potential sticking on the tube walls and caps.
! All buffer volumes should be increased proportionally based on the number of CUT&Tag reactions being performed.
Warm Digitonin Solution #16359 at 90-100°C for 5 min and make sure it is completely thawed and in solution. Immediately place the thawed Digitonin Solution #16359 on ice during use. Store at -20°C when finished for the day.
Thoroughly thaw 200X Protease Inhibitor Cocktail #7012 and 100X Spermidine #27287 before use and store them at -20°C when finished for the day. Please note that the Protease Inhibitor Cocktail #7012 will refreeze when placed on ice due to containing DMSO.
Prepare 100 µl of Complete Antibody Binding Buffer per reaction and place on ice.
|
Complete Antibody Binding Buffer |
Volume (per reaction) |
|
Antibody Binding Buffer (CUT&RUN, CUT&Tag) #15338 |
96 µl |
|
100X Spermidine #27287 |
1 µl |
|
Protease Inhibitor Cocktail (200X) #7012 |
0.5 µl |
|
Digitonin Solution #16359 |
2.5 µl |
Thoroughly mix the activated Concanavalin A Beads prepared in Section I Step 7 by gently pipetting up and down. Add the beads suspension to the washed cell suspension prepared in Section II-A Step 6, or Section II-B Step 9.
Incubate the sample for 5 min at room temperature.
Place the tube on the magnetic rack for 30 sec to 2 min, then remove and discard the supernatant.
Remove tube from the magnet. Add 100 µl of Complete Antibody Binding Buffer per reaction and mix gently by pipetting.
Aliquot 100 µl of the cell:bead suspension into separate 1.5 ml tubes for each reaction and place on ice.
Add the appropriate amount of primary antibody to each reaction and mix gently by pipetting up and down.
NOTE: The amount of antibody required for CUT&Tag varies and should be determined by the user. For the positive control Tri-Methyl-Histone H3 (Lys4) (C42D8) Rabbit mAb #9751, or the negative control Normal Rabbit IgG #2729 or Normal Mouse IgG #68860, add 2 µl of antibody to the reaction. If possible, we highly recommend using CUT&Tag-validated antibodies in the assay. CST offers a selection of CUT&Tag validated antibodies with supporting data and appropriate dilution ratios.
Incubate samples at room temperature for 1 hour. This step can be extended to overnight at 4°C.
Immediately proceed to Section IV.
! All buffer volumes should be scaled proportionally to the number of CUT&Tag reactions being performed.
Warm Digitonin Solution #16359 at 90-100°C for 5 min and make sure it is completely thawed and in solution. Immediately place the thawed Digitonin Solution #16359 on ice during use. Store at -20°C when finished for the day.
Thoroughly thaw 200X Protease Inhibitor Cocktail #7012 and 100X Spermidine #27287 before use and store them at -20°C when finished for the day. Please note that the Protease Inhibitor Cocktail #7012 will refreeze when placed on ice due to containing DMSO.
Freshly prepare 1.05 ml of Digitonin Buffer per reaction and place on ice.
NOTE: Digitonin Buffer prepared here will be used for both Section IV and V.
|
Digitonin Buffer |
Volume (per reaction) |
|
10X Wash buffer (CUT&RUN, CUT&Tag) #31415 |
105 µl |
|
100X Spermidine #27287 |
10.5 µl |
|
Protease Inhibitor Cocktail (200X) #7012 |
5.25 µl |
|
Digitonin Solution #16359 |
26.25 µl |
|
Nuclease free water #12931 |
903 µl |
Make secondary antibody pre-mix. For each reaction, dilute 1 µl of Goat Anti-Rabbit IgG (H+L) Antibody #35401 or 1 µl of Donkey Anti-Mouse IgG (H+L) Antibody #52885 into 50 µl Digitonin Buffer. Proportionally scale up the secondary antibody pre-mix based on the number of reactions. Mix by gently pipetting up and down and place on ice.
Place the sample tubes containing the primary antibody incubation solution from Section III Step 7 on the magnetic rack for 30 sec to 2 min and then remove the supernatant.
Add 50 µl of secondary antibody pre-mix to each sample tube and gently mix the sample by pipetting up and down.
Incubate samples at room temperature for 30 min.
Immediately proceed to Section V.
! All buffer volumes should be increased proportionally based on the number of CUT&Tag reactions being performed.
Make sure the 10% SDS Solution #20533 is completely in solution. Warming it up at 37°C can help to dissolve the SDS precipitates.
Warm Digitonin Solution #16359 at 90-100°C for 5 min and make sure it is completely thawed and in solution. Immediately place the thawed Digitonin Solution #16359 on ice during use. Store at -20°C when finished for the day.
Thoroughly thaw 200X Protease Inhibitor Cocktail #7012 and 100X Spermidine #27287 before use and store them at -20°C when finished for the day. Please note that the Protease Inhibitor Cocktail #7012 will refreeze when placed on ice due to containing DMSO.
Prepare 1.2 ml of High Salt Digitonin Buffer per reaction and place on ice.
|
High Salt Digitonin Buffer |
Volume (per reaction) |
|
10X High Salt Wash Buffer (CUT&Tag) |
120 µl |
|
100X Spermidine #27287 |
12 µl |
|
Protease Inhibitor Cocktail (200X) #7012 |
6 µl |
|
Digitonin Solution #16359 |
30 µl |
|
Nuclease free water #12931 |
1032 µl |
Prepare 150 µl of Tagmentation Buffer per reaction and place on ice.
|
Tagmentation Buffer |
Volume (per reaction) |
|
High Salt Digitonin Buffer (described above) |
148.5 µl |
|
Magnesium Chloride |
1.5 µl |
For each reaction, make a pAG-Tn5 pre-mix by diluting 2 µl of CUT&Tag pAG-Tn5 (Loaded) #79561 into 50 µl of High Salt Digitonin Buffer. Proportionally scale up the pAG-Tn5 pre-mix based on the number of reactions. Mix by gently pipetting up and down and place on ice.
Place the sample tubes containing the secondary antibody incubation solution from Section IV Step 4 on the magnetic rack for 30 sec to 2 min and then remove the supernatant.
Remove tubes from the magnetic rack and add 500 µl of Digitonin Buffer prepared in Section IV. Resuspend beads by gently pipetting up and down.
Place the tubes on the magnetic rack for 30 sec to 2 min and then remove the supernatant.
Repeat steps 3 and 4 one time for a second wash.
Remove tubes from magnetic rack. Add 50 µl of pAG-Tn5 pre-mix to each tube and gently mix the sample by pipetting up and down.
Incubate samples at room temperature for 1 hr.
Place the tubes on the magnetic separation rack for 30 sec to 2 min and then remove the supernatant.
Remove tubes from the magnetic separation rack. Add 500 µl of High Salt Digitonin Buffer and resuspend beads by gently pipetting up and down.
Place the tubes on the magnetic rack for 30 sec to 2 min and then remove the supernatant.
Repeat steps 9 and 10 one time for a second wash.
Remove tubes from magnetic rack. Add 150 µl of Tagmentation Buffer to each tube and mix by pipetting up and down.
Incubate samples at 37°C for 1 hr.
To stop tagmentation, add 6.75 µl of 0.5 M EDTA #7011, 8.25 µl of 10% SDS #20533 and 1.5 µl of 20 mg/mL Proteinase K #10012 to each sample and mix by a quick vortex.
Incubate samples at 58°C for 1 hr to release tagmented chromatin fragments into solution. This incubation can be extended overnight. If incubating overnight, use safe-lock tubes to prevent sample evaporation.
NOTE: If starting with fixed cells or tissues, incubate samples at 65°C for 2 hr in safe-lock tubes to sufficiently reverse cross-links. This incubation can be extended overnight.
Centrifuge tubes at room temperature for 2 min at 16,000x g and place the tubes on a magnetic rack for 30 sec to 2 min.
Transfer the supernatants to new 1.5 ml tubes. These are your CUT&Tag DNA samples to be purified.
Proceed to Section VI. (SAFE STOP) Alternatively, samples can be stored at -20°C for up to 1 week. However, be sure to warm samples to room temperature before DNA purification (Section VI).
Please equilibrate DNA Purification Columns, DNA Binding Buffer, DNA Wash Buffer, and DNA Elution Buffer to room temperature before use.
!! Add 24 ml of ethanol (96-100%) to DNA Wash Buffer before use. This step only has to be performed once prior to the first set of DNA purifications.
Use one DNA Purification collection tube for each CUT&Tag DNA sample to be purified.
Add 833 µl DNA Binding Buffer to each CUT&Tag DNA sample and mix by pipetting up and down.
NOTE: 5 volumes of DNA Binding Buffer should be used for every 1 volume of sample.
Transfer 600 µl of each sample from Step 1 to a DNA spin column in collection tube.
Centrifuge at 18,500 x g in a microcentrifuge for 30 sec.
Remove the spin column from the collection tube and discard the liquid. Replace the spin column in the empty collection tube.
Repeat steps 2-4 until the entire sample from Step 1 has been spun through the spin column. Replace the spin column in the empty collection tube.
Add 750 µl of DNA Wash Buffer to the spin column in collection tube.
Centrifuge at 18,500 x g in a microcentrifuge for 30 sec.
Remove the spin column from the collection tube and discard the liquid. Replace spin column in the empty collection tube.
Centrifuge at 18,500 x g in a microcentrifuge for 30 sec.
Discard collection tube and liquid. Retain spin column.
Add 30 µl of DNA Elution Buffer to each spin column and place into a clean 1.5 ml tube.
NOTE: To fully elute DNA from the columns, a minimum volume of 30 µl of DNA Elution Buffer is required.
Centrifuge at 18,500 x g in a microcentrifuge for 30 sec to elute DNA.
Remove and discard DNA spin column. Eluate is now purified DNA. (SAFE STOP) Samples can be stored at -20°C for up to 6 months.
NOTE: Considering the typical low yield of CUT&Tag DNA, we strongly recommend using all of the 30 µl of DNA sample for library amplification.
The immuno-enriched DNA samples prepared with this kit are directly compatible with NG-seq. For downstream NG-seq DNA library construction, use a DNA library preparation protocol or kit compatible with your downstream sequencing platform. For sequencing on Illumina Systems platforms, we recommend using the CUT&Tag Dual Index Primers and PCR Master Mix for Illumina #47415. Please note that the DNA Library Prep Kit for Illumina Systems (ChIP-seq, CUT&RUN) #56795 and Multiplex Oligos for Illumina Systems (ChIP-seq, CUT&RUN) #29580 or #47538 are not compatible with CUT&Tag DNA samples.
Additional Recommendations for DNA Library Preparation:
The yield of the amplified CUT&Tag DNA library can vary based on the DNA quantification method used. If using the Nanodrop or QIAxpert Systems, the expected reading is 10-20 ng/µl for histone targets and 5-12 ng/µl for non-histone targets. If the library concentration is lower than 3 ng/µl with the Nanodrop or QIAxpert Systems, please refer to the troubleshooting guide before sequencing your samples. If using the Qubit Fluorometric Quantification system or the Picogreen assay, the expected reading is 3-10 ng/µl for histone targets and could be lower than 1 ng/µl for non-histone targets. Because of these low concentrations, the Bioanalyzer or TapeStation systems may generate a profile with very weak or even no visible peaks, especially for targets that are not abundant in cells. In these cases, we still recommend continuing with NGS if the positive control Tri-Methyl-Histone H3 (Lys4) (C42D8) Rabbit mAb #9751 generates the expected library yield and/or Bioanalyzer peaks, indicative of an overall successful experiment. Please refer to our CUT&Tag FAQ web page for supporting data or if extra guidance is needed to pool together samples with a variety of yields.
A sequencing depth of 2 million reads per sample is usually sufficient for CUT&Tag assay, regardless of target types. The duplication rate of reads significantly increases if the sequencing depth is greater than fifteen million per sample. The signal to noise ratio decreases if the sequencing depth is lower than one million reads per sample.
If starting with less than 20,000 cells, it is common to obtain lower mapping rates or higher duplication rates in the NGS reads. If this happens, we recommend increasing the sequencing depth to obtain enough unique mapped reads for downstream data analysis.
We strongly recommend using live cells whenever possible. For certain cell types that are fragile or sensitive to concanavalin A, please refer to the protocol below to lightly fix cells prior to the CUT&Tag experiment. Please note that cell fixation does not significantly increase CUT&Tag signals. In fact, over-fixation may lead to weaker CUT&Tag signals. Refer to the description in Section II to determine the appropriate cell number in each reaction.
NOTE: The following reagents are required for fixed cell preparation and are not included in this kit: 37% formaldehyde or 16% Formaldehyde Methanol-Free #12606 and Glycine Solution (10X) #7005.
! All buffer volumes should be scaled proportionally to the number of CUT&Tag reactions being performed.
Prepare 2.7 µl of 37% formaldehyde or 6.25 µl of 16% Formaldehyde, Methanol-Free #12606 per 1 ml of cell suspension to be processed and keep at room temperature. Use fresh formaldehyde that is not past the manufacturer’s expiration date.
Thoroughly thaw 200X Protease Inhibitor Cocktail #7012 and 100X Spermidine #27287 before use and store them at -20°C when finished for the day. Please note that the Protease Inhibitor Cocktail #7012 will refreeze when placed on ice due to containing DMSO.
Prepare Complete Wash Buffer (2 ml for each cell preparation and an additional 100 µl for each CUT&Tag reaction) and keep it at room temperature. For example, if using both untreated and drug-treated cells (2 cell preparations) and testing with 4 antibodies (positive control H3K4me3 #9751, negative control IgG #2729 or #68860, and two experimental antibodies; 8 reactions), a total of 4.8 ml of Complete Wash Buffer will be needed.
|
Complete Wash Buffer |
Volume (per cell preparation) |
Volume (per reaction) |
Total volume |
|
10X Wash buffer (CUT&RUN, CUT&Tag) #31415 |
200 µl |
10 µl |
Add both columns together for total volume needed for each reagent. |
|
100X Spermidine #27287 |
20 µl |
1 µl |
|
|
Protease Inhibitor Cocktail (200X) #7012 |
10 µl |
0.5 µl |
|
|
Nuclease free water #12931 |
1770 µl |
88.5 µl |
Harvest 100,000 live cells for each reaction.
NOTE: For adherent cells, detach them from the dish using Trypsin and neutralize with at least 3 volumes of tissue culture medium. We do not recommend scraping the cells from the dish to prevent cell lysis. Cells should be counted accurately using a hemocytometer or other cell counter to ensure the proper number of cells are being used for the experiment.
Add 2.7 µl of 37% formaldehyde or 6.25 µl of 16% Formaldehyde, Methanol-Free #12606 per 1 ml of cell suspension to achieve a final concentration of 0.1% formaldehyde. Swirl tube to mix and incubate at room temperature for 2 min.
Stop cross-linking by adding 100 µl of Glycine Solution (10X) #7005 per 1 ml of fixed cell suspension. Swirl the tube to mix and incubate at room temperature for 5 min.
Centrifuge cell suspension for 3 min at 3,000 x g at 4°C and remove the supernatant. Immediately proceed to Step 5. (SAFE STOP) Alternatively, fixed cell pellets may be stored at -80°C before using for up to 6 months.
NOTE: If working with fewer than 100,000 total cells and the centrifuged cell pellet is not visible by eye, we do NOT recommend freezing down cell pellets. Instead, we recommend continuing on with the protocol and skipping the wash steps 5 to 7 below. After the initial centrifugation of the cell suspension in Step 4, remove most of the supernatant, leaving behind ≤40 µl cell medium per reaction. Then in Step 8 add enough Complete Wash Buffer to the cell suspension to achieve a total volume of 100 µl per reaction.
Resuspend cell pellet in 1 ml of Complete Wash Buffer by gently pipetting up and down.
Centrifuge for 3 min at 3,000 x g at 4°C and remove the supernatant.
Wash the cell pellet a second time by repeating steps 5 and 6 one time.
For each reaction, add 100 µl of Complete Wash Buffer and resuspend the cell pellet by gently pipetting up and down.
Immediately proceed to Section III.
For most tissue types, 1 mg of fresh tissue is sufficient to generate robust enrichment of histones. If fresh tissue is not accessible, lightly fixed tissue (0.1% formaldehyde for 2 min) can be used. Fixed tissue samples can be frozen at -80°C up to 6 months before using. Over-fixation may lead to weaker CUT&Tag signals. The CUT&Tag assay does not work well for enrichment of transcription factors and cofactors from tissues. For analysis of transcription factors and cofactors, we recommend using the CUT&RUN Assay Kit #86652.
NOTE: The following reagents are required for fixed tissue preparation and are not included in this kit: 37% formaldehyde or 16% Formaldehyde Methanol-Free #12606, Phosphate Buffered Saline (PBS) #9872, and Glycine Solution (10X) #7005.
! All buffer volumes should be increased proportionally based on the number of CUT&Tag reactions being performed.
Prepare 2.7 µl of 37% formaldehyde or 6.25 µl of 16% Formaldehyde, Methanol-Free #12606 per 1 ml of cell suspension to be processed and keep at room temperature. Use fresh formaldehyde that is not past the manufacturer's expiration date.
Prepare 100 µl of Glycine Solution (10X) #7005 per 1 ml of fixation buffer.
Thoroughly thaw 200X Protease Inhibitor Cocktail #7012 and 100X Spermidine #27287 before use and store them at -20°C when finished for the day. Please note that the Protease Inhibitor Cocktail #7012 will refreeze when placed on ice due to containing DMSO.
Prepare Complete Wash Buffer (3 ml for each tissue type and additional 100 µl for each reaction) and keep it at room temperature to minimize stress on the cells.
|
Complete Wash Buffer |
Volume (per tissue type) |
Volume (per reaction) |
Total volume |
|
10X Wash buffer (CUT&RUN, CUT&Tag) #31415 |
300 µl |
10 µl |
Add both columns together for total volume needed for each reagent. |
|
100X Spermidine #27287 |
30 µl |
1 µl |
|
|
Protease Inhibitor Cocktail (200X) #7012 |
15 µl |
0.5 µl |
|
|
Nuclease free water #12931 |
2655 µl |
88.5 µl |
Prepare 1 ml Fixation Buffer for each tissue type. Use fresh formaldehyde that is not past the manufacturer’s expiration date.
|
Fixation Buffer |
Volume (per tissue type) |
|
Formaldehyde |
2.7 µl of 37% or 6.25 µl of 16% |
|
Protease Inhibitor Cocktail (200X) #7012 |
5 µl |
|
Phosphate Buffered Saline (PBS) #9872 |
992.3 µl |
Prepare 1 ml of Fixation Wash Buffer for each tissue type and place on ice.
|
Fixation Wash Buffer |
Volume (per tissue type) |
|
Protease Inhibitor Cocktail (200X) #7012 |
5 µl |
|
Phosphate Buffered Saline (PBS) #9872 |
995 µl |
Weigh 1 mg fresh tissues for each reaction.
Place tissue sample in a dish and finely mince using a clean scalpel or razor blade. Keep dish on ice. It is important to keep the tissue cold to avoid protein degradation.
Immediately transfer minced tissue to 1 ml of Fixation Buffer and swirl tube to mix.
NOTE: This volume of fixation solution is sufficient for up to 50 mg of tissue. If processing >50 mg, scale up the amount of Fixation Buffer used in Step 3 and Fixation Wash Buffer used in Step 7 accordingly.
Incubate at room temperature for 2 min.
Stop cross-linking by adding 100 µl of Glycine Solution (10X) #7005 per 1 ml of Fixation Buffer. Swirl the tube to mix and incubate at room temperature for 5 min.
Centrifuge tissue for 5 min at 2,000 x g at 4°C and remove the supernatant.
Resuspend tissue with 1 ml of Fixation Wash Buffer.
Centrifuge for 5 min at 2,000 x g at 4°C and remove the supernatant and proceed to step 9. (SAFE STOP) Alternatively, fixed tissue pellets may be stored at -80°C before disaggregation for up to 6 months.
Resuspend tissue in 1 ml of Complete Wash Buffer and transfer the sample to a Dounce homogenizer.
Disaggregate tissue pieces into single-cell suspension with 20-25 strokes until no tissue chunks are observed.
Transfer cell suspension to a 1.5 ml tube and centrifuge at 3,000 x g for 3 min at room temperature, remove supernatant from cells.
Resuspend cell pellet in 1 ml of Complete Wash Buffer.
Centrifuge cell suspension for 3 min at 3,000 x g at room temperature and remove the supernatant.
Wash the cell pellet a second time by repeating steps 12 and 13 one time.
For each reaction, add 100 µl of Complete Wash Buffer and resuspend the cell pellet by gently pipetting up and down.
Immediately proceed to Section III.
In the CUT&Tag protocol, the addition of digitonin to the buffers facilitates the permeabilization of cell membranes and entry of the primary antibody, secondary antibody, and pAG-Tn5 enzyme into the cells and nuclei. Therefore, having an adequate amount of digitonin in the buffers is critical to the success of antibody and enzyme binding, and digestion of targeted genomic loci. Different cell lines exhibit varying sensitivities to digitonin cell permeabilization. While the amount of digitonin recommended in this protocol should be sufficient for permeabilization of most cell lines or tissues, you can test your specific cell line or tissue using this protocol. We have found that the addition of excess digitonin is not deleterious to the assay, so there is no need to perform a concentration curve. Rather, a quick test to determine if the recommended amount of digitonin works for your cell line is sufficient.
Warm Digitonin Solution #16359 at 90-100°C for 5 min and make sure it is completely thawed and in solution. Immediately place the thawed Digitonin Solution #16359 on ice during use. Store at -20°C when finished for the day.
Prepare 100 µl of 1X Wash Buffer per reaction. It is not necessary to add spermidine or Protease Inhibitors in the buffer for this test.
|
1X Wash Buffer |
Volume (per reaction) |
|
10X Wash Buffer (CUT&RUN, CUT&Tag) #31415 |
10 µl |
|
Nuclease-free Water #12931 |
90 µl |
In a 1.5 ml tube, collect 100,000 cells (from Section II-A, Step 1), centrifuge for 3 min at 600 x g at room temperature and withdraw the supernatant. For tissue, collect disaggregated cells from 1 mg of tissue (from Section II-B, Steps 1-8).
Resuspend cell pellet in 100 µl of 1X Wash Buffer.
Add 2.5 µl Digitonin Solution #16359 to each reaction and incubate for 10 min at room temperature.
Mix 10 µl of cell suspension with 10 µl of 0.4% Trypan blue stain.
Use a hemocytometer or cell counter to count the number of stained cells and the total number of cells. Sufficient permeabilization results in > 90% of cells staining with Trypan blue.
If less than 90% of cells stain with Trypan blue, then increase the amount of Digitonin Solution #16359 added to each reaction and repeat steps 1-5 until > 90% cells are permeabilized and stained. Use this amount of Digitonin Solution #16359 in Sections I - V.
For a detailed troubleshooting guide, please go to https://cellsignal.com/learn-and-support/troubleshooting/cutandtag-troubleshooting-guide
CUT&Tag provided under a license from Active Motif, Inc. under U.S. Patent No. 10,689,643 and 9,938,524, foreign equivalents, and child patents deriving therefrom. For purchaser's internal research use only. May not be used for resale, services, or other commercial use.
U.S. Patent No. 11,733,248, foreign equivalents, and child patents deriving therefrom.
Protocol Id: 2745
Human, Mouse, Rat, Hamster, Monkey, D. melanogaster
Monoclonal antibody is produced by immunizing animals with a full length GST-CREB fusion protein. The epitope has been mapped to residues surrounding Gly61.
CREB is a bZIP transcription factor that activates target genes through cAMP response elements. CREB is able to mediate signals from numerous physiological stimuli, resulting in regulation of a broad array of cellular responses. While CREB is expressed in numerous tissues, it plays a large regulatory role in the nervous system. CREB is believed to play a key role in promoting neuronal survival, precursor proliferation, neurite outgrowth, and neuronal differentiation in certain neuronal populations (1-3). Additionally, CREB signaling is involved in learning and memory in several organisms (4-6). CREB is able to selectively activate numerous downstream genes through interactions with different dimerization partners. CREB is activated by phosphorylation at Ser133 by various signaling pathways, including Erk, Ca2+, and stress signaling. Some of the kinases involved in phosphorylating CREB at Ser133 are p90RSK, MSK, CaMKIV, and MAPKAPK-2 (7-9).
Explore pathways related to this product.
STRING - Known and Predicted Protein-Protein Interactions.
Except as otherwise expressly agreed in a writing signed by a legally authorized representative of CST, the following terms apply to Products provided by CST, its affiliates or its distributors. Any Customer's terms and conditions that are in addition to, or different from, those contained herein, unless separately accepted in writing by a legally authorized representative of CST, are rejected and are of no force or effect.
Products are labeled with For Research Use Only or a similar labeling statement and have not been approved, cleared, or licensed by the FDA or other regulatory foreign or domestic entity, for any purpose. Customer shall not use any Product for any diagnostic or therapeutic purpose, or otherwise in any manner that conflicts with its labeling statement. Products sold or licensed by CST are provided for Customer as the end-user and solely for research and development uses. Any use of Product for diagnostic, prophylactic or therapeutic purposes, or any purchase of Product for resale (alone or as a component) or other commercial purpose, requires a separate license from CST. Customer shall (a) not sell, license, loan, donate or otherwise transfer or make available any Product to any third party, whether alone or in combination with other materials, or use the Products to manufacture any commercial products, (b) not copy, modify, reverse engineer, decompile, disassemble or otherwise attempt to discover the underlying structure or technology of the Products, or use the Products for the purpose of developing any products or services that would compete with CST products or services, (c) not alter or remove from the Products any trademarks, trade names, logos, patent or copyright notices or markings, (d) use the Products solely in accordance with CST Product Terms of Sale and any applicable documentation, and (e) comply with any license, terms of service or similar agreement with respect to any third party products or services used by Customer in connection with the Products.